1. 如何部署 Jenkins
为了方面进行下面的测试,先介绍两种部署 Jenkins 的方式,这里使用的是 shaowenchen/jenkins:2.277.4 镜像。在生产环境中,需要替换为官方 jenkins/jenkins 镜像或自己定制的镜像。
1.1 docker-compose 运行
docker-compose.yaml 文件
version: '3'

services:
  jenkins:
    image: shaowenchen/jenkins:2.277.4
    container_name: jenkins
    restart: always
    network_mode: "bridge"
    environment:
    - JAVA_OPTS="-Xms1Gi -Xmx4Gi"
    ports:
      - 8080:8080
      - 50000:50000
      - 2222:2222
    environment:
      TZ: Asia/Shanghai
    volumes:
      - /Volumes/Data/jenkins_home:/var/jenkins_home
在本地创建一个目录 /Volumes/Data/jenkins_home 用于存储 Jenkins 的数据,8080 端口用于 Web 页面访问、50000 端口用于连接 Agent、2222 端口用于 SSH 管理 Jenkins。
运行命令之后,在滚动的日志中可以看到 admin 用户的初始化密码。我在本地使用的就是这种部署方式。
1.2 Kubernetes 上部署
values.yaml 文件
master:
  image: "shaowenchen/jenkins"
  tag: "2.277.4"
  serviceType: NodePort
  nodePort: 38080
  adminPassword: password
  imagePullPolicy: "Always"
  resources:
    requests:
      cpu: "1"
      memory: "2Gi"
    limits:
      cpu: "4"
      memory: "4Gi"
  installPlugins: []

persistence:
  enabled: true
  size: "10Gi"
在 installPlugins 配置项,可以指定 Jenkins 启动时,需要安装的插件列表。
1
2
| helm repo add stable https://charts.helm.sh/stable
helm repo update
|
1
| helm install jenkins stable/jenkins -f ./values.yaml --namespace default
|
1
| helm uninstall jenkins --namespace default
|
2. 使用 CLI 管理 Jenkins
这里介绍两种方式,可以用于在命令行管理 Jenkins。 Jenkins 同时支持 SSH 和 Http 协议的 CLI 管理。
2.1 第一种,通过 SSH
Jenkins -> 用户 -> 设置 -> SSH Public Keys -> 保存
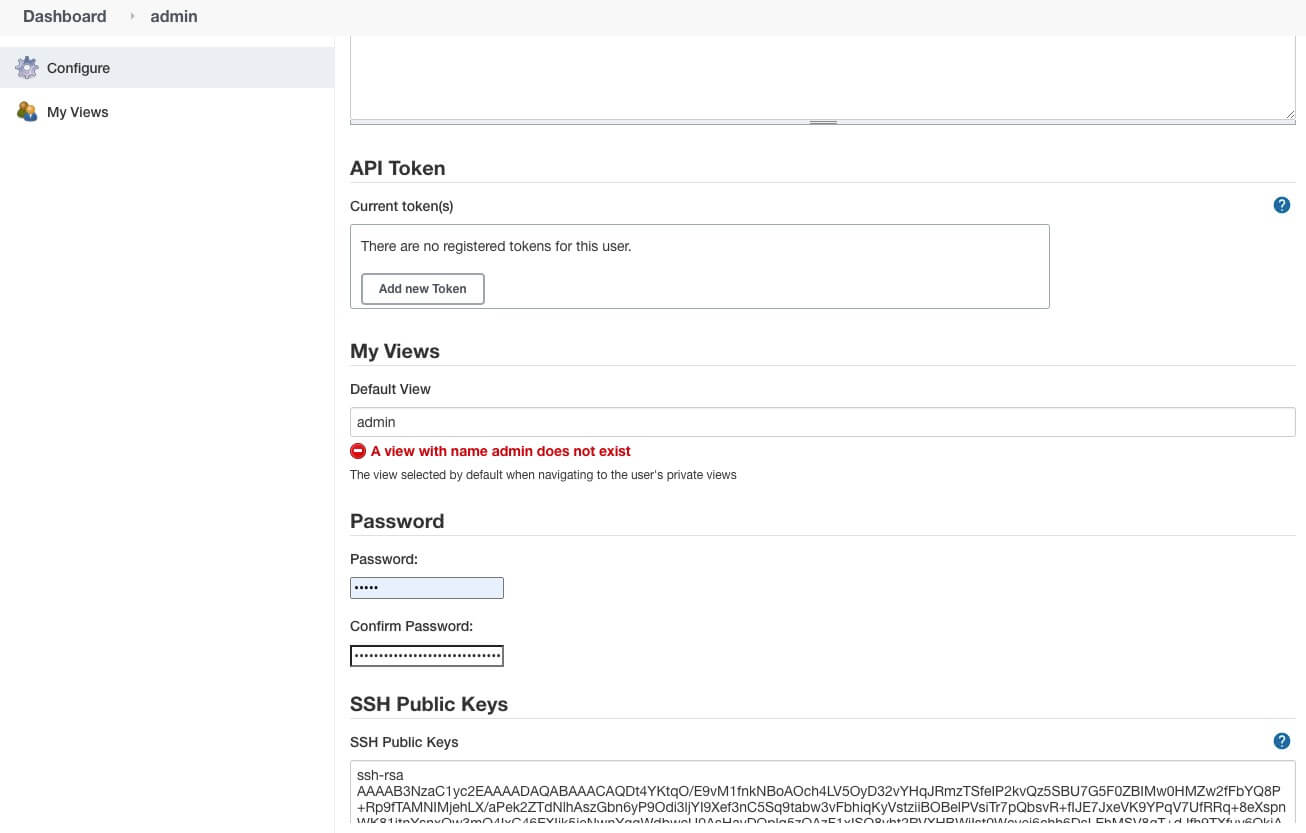
系统管理 -> 全局安全配置 -> SSH Server,指定端口 -> 保存
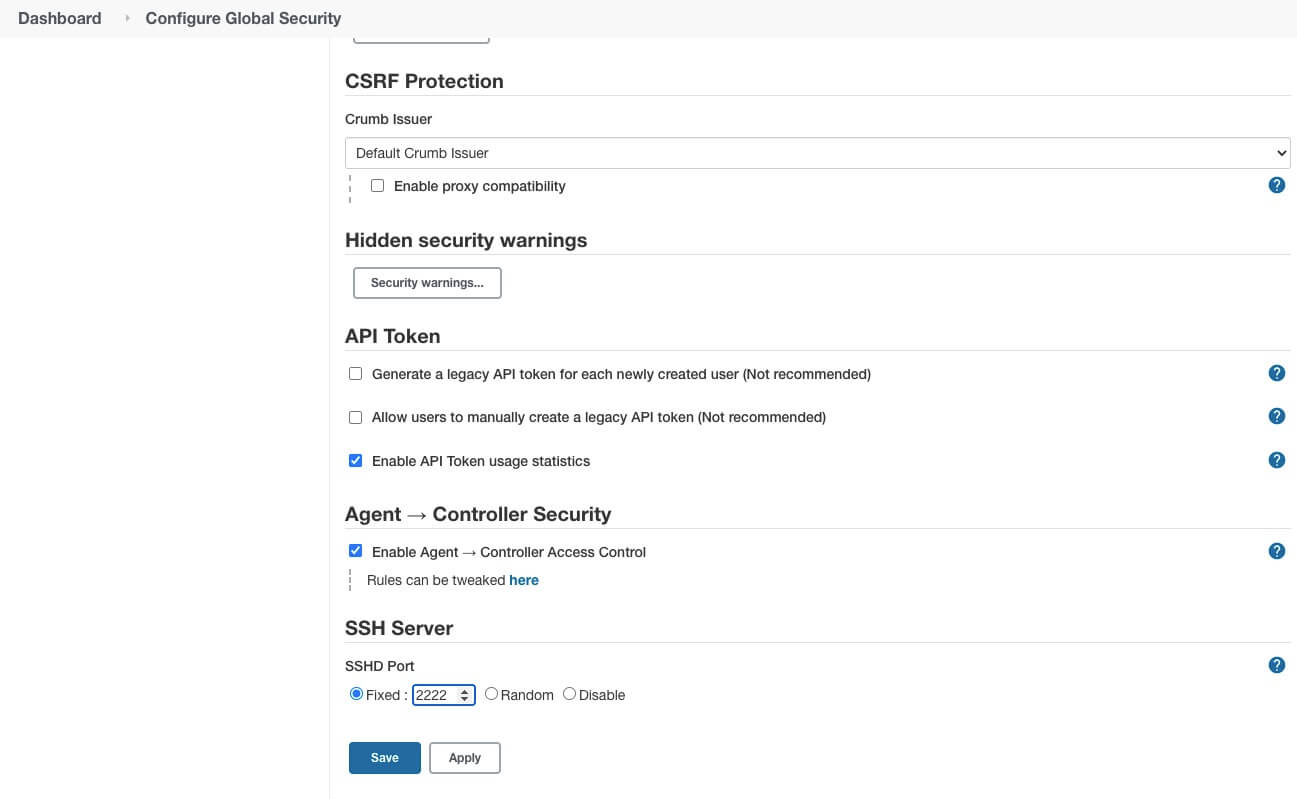
这里使用的是 2222 端口,可以根据自己的需要进行配置。
这里使用的是 Jenkins 默认的管理员账户 admin
1
2
3
| ssh -l admin -p 2222 localhost version
2.277.4
|
2.2 第二种,通过客户端
http://localhost:8080/ 是 Jenkins 的访问页面,而在页面地址 http://localhost:8080/jnlpJars/jenkins-cli.jar 可以下载 Jenkins 客户端工具。
不同的 Jenkins 版本之间,CLI 工具可能存在不兼容,建议下载当前环境下的客户端工具。这里的 xxx 指的是 admin 用户在页面的登录密码,也可以是用户生成的 API Token。
  1
  2
  3
  4
  5
  6
  7
  8
  9
 10
 11
 12
 13
 14
 15
 16
 17
 18
 19
 20
 21
 22
 23
 24
 25
 26
 27
 28
 29
 30
 31
 32
 33
 34
 35
 36
 37
 38
 39
 40
 41
 42
 43
 44
 45
 46
 47
 48
 49
 50
 51
 52
 53
 54
 55
 56
 57
 58
 59
 60
 61
 62
 63
 64
 65
 66
 67
 68
 69
 70
 71
 72
 73
 74
 75
 76
 77
 78
 79
 80
 81
 82
 83
 84
 85
 86
 87
 88
 89
 90
 91
 92
 93
 94
 95
 96
 97
 98
 99
100
101
102
103
104
105
106
107
108
109
110
111
112
113
114
115
116
117
118
119
120
121
122
123
124
125
126
127
128
129
130
131
132
133
134
135
136
137
138
139
140
141
142
143
144
145
146
147
148
149
150
| java -jar jenkins-cli.jar -s http://localhost:8080/ -auth admin:xxx help
add-job-to-view
Adds jobs to view.
apply-configuration
Apply YAML configuration to instance
build
Builds a job, and optionally waits until its completion.
cancel-quiet-down
Cancel the effect of the "quiet-down" command.
check-configuration
Check YAML configuration to instance
clear-queue
Clears the build queue.
connect-node
Reconnect to a node(s)
console
Retrieves console output of a build.
copy-job
Copies a job.
create-credentials-by-xml
Create Credential by XML
create-credentials-domain-by-xml
Create Credentials Domain by XML
create-job
Creates a new job by reading stdin as a configuration XML file.
create-node
Creates a new node by reading stdin as a XML configuration.
create-view
Creates a new view by reading stdin as a XML configuration.
declarative-linter
Validate a Jenkinsfile containing a Declarative Pipeline
delete-builds
Deletes build record(s).
delete-credentials
Delete a Credential
delete-credentials-domain
Delete a Credentials Domain
delete-job
Deletes job(s).
delete-node
Deletes node(s)
delete-view
Deletes view(s).
disable-job
Disables a job.
disable-plugin
Disable one or more installed plugins.
disconnect-node
Disconnects from a node.
enable-job
Enables a job.
enable-plugin
Enables one or more installed plugins transitively.
export-configuration
Export jenkins configuration as YAML
get-credentials-as-xml
Get a Credentials as XML (secrets redacted)
get-credentials-domain-as-xml
Get a Credentials Domain as XML
get-job
Dumps the job definition XML to stdout.
get-node
Dumps the node definition XML to stdout.
get-view
Dumps the view definition XML to stdout.
groovy
Executes the specified Groovy script.
groovysh
Runs an interactive groovy shell.
help
Lists all the available commands or a detailed description of single command.
import-credentials-as-xml
Import credentials as XML. The output of "list-credentials-as-xml" can be used as input here as is, the only needed change is to set the actual Secrets which are redacted in the output.
install-plugin
Installs a plugin either from a file, an URL, or from update center.
keep-build
Mark the build to keep the build forever.
list-changes
Dumps the changelog for the specified build(s).
list-credentials
Lists the Credentials in a specific Store
list-credentials-as-xml
Export credentials as XML. The output of this command can be used as input for "import-credentials-as-xml" as is, the only needed change is to set the actual Secrets which are redacted in the output.
list-credentials-context-resolvers
List Credentials Context Resolvers
list-credentials-providers
List Credentials Providers
list-jobs
Lists all jobs in a specific view or item group.
list-plugins
Outputs a list of installed plugins.
mail
Reads stdin and sends that out as an e-mail.
offline-node
Stop using a node for performing builds temporarily, until the next "online-node" command.
online-node
Resume using a node for performing builds, to cancel out the earlier "offline-node" command.
quiet-down
Quiet down Jenkins, in preparation for a restart. Don’t start any builds.
reload-configuration
Discard all the loaded data in memory and reload everything from file system. Useful when you modified config files directly on disk.
reload-jcasc-configuration
Reload JCasC YAML configuration
reload-job
Reload job(s)
remove-job-from-view
Removes jobs from view.
replay-pipeline
Replay a Pipeline build with edited script taken from standard input
restart
Restart Jenkins.
restart-from-stage
Restart a completed Declarative Pipeline build from a given stage.
safe-restart
Safely restart Jenkins.
safe-shutdown
Puts Jenkins into the quiet mode, wait for existing builds to be completed, and then shut down Jenkins.
session-id
Outputs the session ID, which changes every time Jenkins restarts.
set-build-description
Sets the description of a build.
set-build-display-name
Sets the displayName of a build.
set-external-build-result
Set external monitor job result.
shutdown
Immediately shuts down Jenkins server.
stop-builds
Stop all running builds for job(s)
support
Generates a diagnostic support bundle.
update-credentials-by-xml
Update Credentials by XML
update-credentials-domain-by-xml
Update Credentials Domain by XML
update-job
Updates the job definition XML from stdin. The opposite of the get-job command.
update-node
Updates the node definition XML from stdin. The opposite of the get-node command.
update-view
Updates the view definition XML from stdin. The opposite of the get-view command.
version
Outputs the current version.
wait-node-offline
Wait for a node to become offline.
wait-node-online
Wait for a node to become online.
who-am-i
Reports your credential and permissions.
|
CLI 工具基本包含了对流水线任务、节点、凭证,还有 Jenkins 的管理功能,能够覆盖大部分的运维场景需求。
3. 定制 Jenkins 版本
3.1 下载 custom-war-packager-cli 工具
访问地址 https://repo.jenkins-ci.org/list/releases/io/jenkins/tools/custom-war-packager/custom-war-packager-cli/ ,下载最新版本的 custom-war-packager 工具,注意选择带 with-dependencies 的包。
这里我下载的版本是 2.0-alpha-5
1
| wget https://repo.jenkins-ci.org/list/releases/io/jenkins/tools/custom-war-packager/custom-war-packager-cli/2.0-alpha-5/custom-war-packager-cli-2.0-alpha-5-jar-with-dependencies.jar -O custom-war-packager-cli.jar
|
3.2 定制化 Jenkins
具体配置可以参考:https://github.com/jenkinsci/custom-war-packager/ 。下面是一份我的测试配置:
config.yaml 文件
 1
 2
 3
 4
 5
 6
 7
 8
 9
10
11
12
13
14
15
16
17
18
19
20
| bundle:
groupId: com.dev
artifactId: "jenkins"
description: "Jenkins Custom With Package"
vendor: "Jenkins Project"
buildSettings:
docker:
base: jenkins/jenkins:2.277.4
tag: shaowenchen/jenkins:2.277.4
build: true
war:
groupId: org.jenkins-ci.main
artifactId: jenkins-war
source:
version: 2.277.4
plugins:
- groupId: io.jenkins
artifactId: configuration-as-code
source:
version: 1.47
|
这里主要关注两个点:buildSettings 和 plugins。也可以指定 CasC 文件。
- buildSettings,指定构建产物。这里的意思是基于
jenkins/jenkins:2.277.4 镜像,打包出 shaowenchen/jenkins:2.277.4 镜像。 - plugins,指定需要下载的插件列表。
下面进行编译镜像:
1
| java -jar ./custom-war-packager-cli.jar --installArtifacts -configPath=./config.yaml
|
这样一个定制化的 Jenkins 镜像就产生了,直接运行 shaowenchen/jenkins:2.277.4,无需安装,就已经内置了 configuration-as-code 插件。
4. 如何给 Jenkins 添加新的插件
4.1 第一种,通过页面搜索或离线上传
打开 Jenkins 的插件管理页面,直接在线搜索。
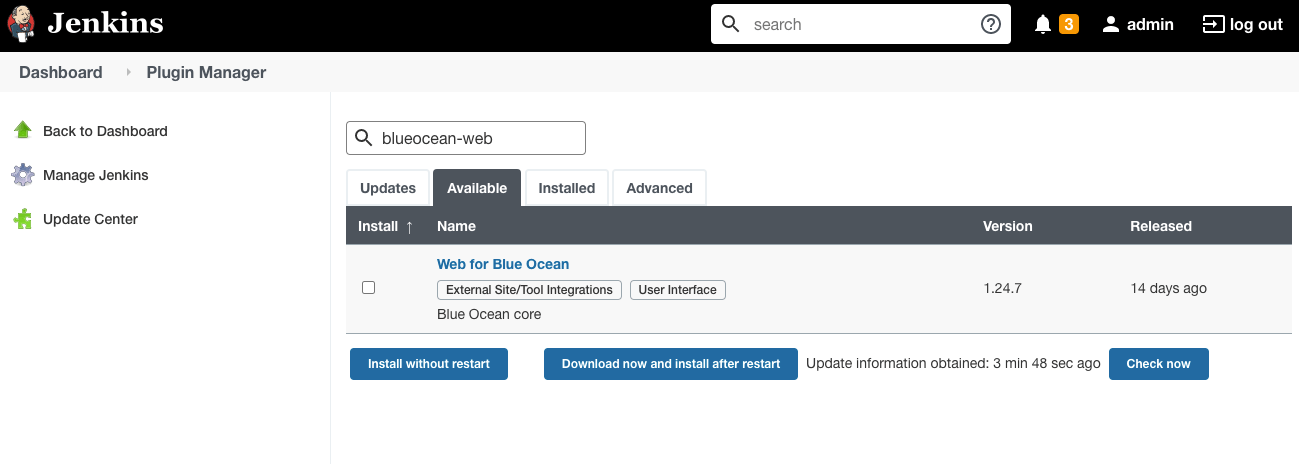
然后,点击安装即可。
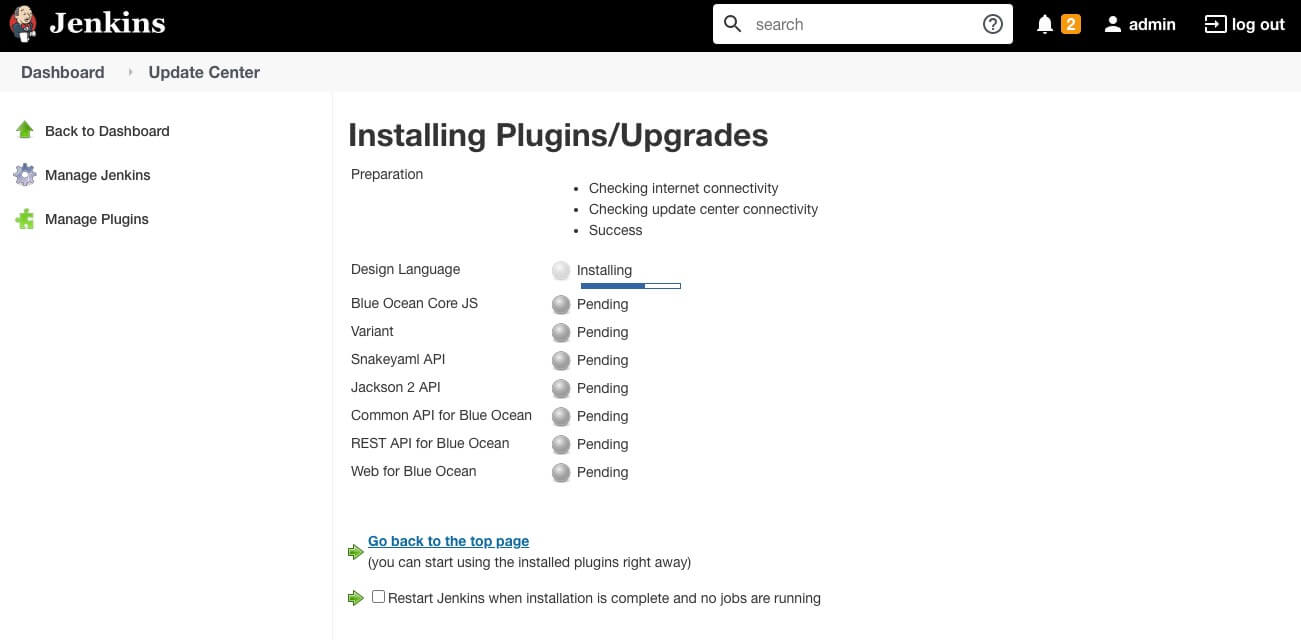
官方默认的插件来源是 https://updates.jenkins.io/update-center.json 。如果访问不够快,可以修改为其他源。在插件管理 -> 高级 -> 升级站点中,将 URL 替换为 https://mirrors.tuna.tsinghua.edu.cn/jenkins/updates/update-center.json 即可。
另一种方式是离线上传,但是 Jenkins 的插件之间会有依赖,离线上传得上传全部依赖包,比较麻烦,不推荐使用。在离线环境,可以将依赖的插件列表整理到文本,然后使用 plugin-installation-manager-tool 下载之后,通过 Nginx 提供插件源。
4.2 第二种,通过 CLI 工具
前面提到通过 CLI 工具可以管理 Jenkins,其中就包括插件的管理。
- 使用客户端的 install-plugin 子命令安装指定的插件
1
| java -jar jenkins-cli.jar -s http://localhost:8080/ -auth admin:xxx install-plugin blueocean-web:1.24.7
|
1
| java -jar jenkins-cli.jar -s http://localhost:8080/ -auth admin:xxx restart
|
但这种方式并不能解决插件依赖冲突问题。也就是当新插件 A 依赖插件 B 的最新版本时,B 插件不会自动被更新,这会导致新插件不可用。如果直接升级 B ,又可能导致其他依赖于 B 的插件不可用。这里需要进行版本依赖的判定。
4.3 第三种,通过 custom-war-packager
通过前面的学习,我们知道只需要在 config.yaml 文件中添加新的插件即可。
1
2
3
4
5
6
7
8
9
| plugins:
- groupId: io.jenkins
artifactId: configuration-as-code
source:
version: 1.47
- groupId: io.jenkins.blueocean
artifactId: blueocean-web
source:
version: 1.24.7
|
接着重新编译打包,但是发现插件并不能正常工作,同样是没有解决插件依赖冲突问题。
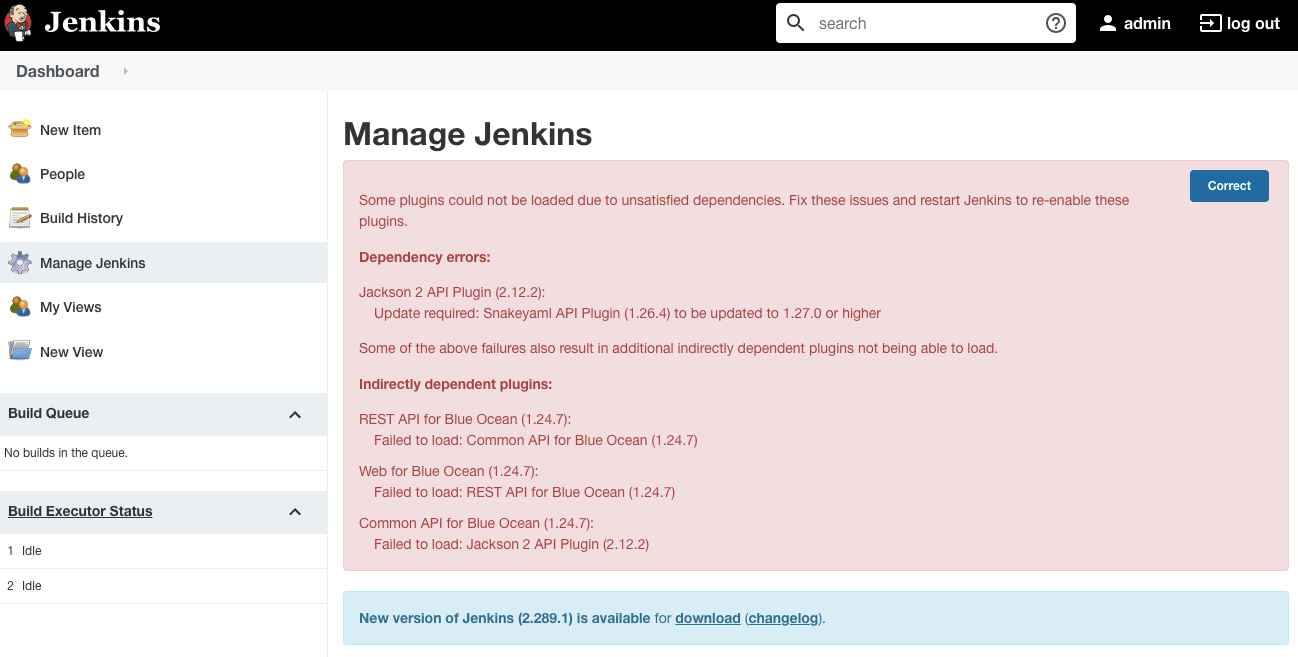
根据页面提示,我们需要升级一个依赖包 Snakeyaml API Plugin 从 1.26.4 到 1.27.0。这时,只需要将其明文写在 config.yaml 文件中即可。
 1
 2
 3
 4
 5
 6
 7
 8
 9
10
11
12
13
| plugins:
- groupId: io.jenkins
artifactId: configuration-as-code
source:
version: 1.47
- groupId: io.jenkins.blueocean
artifactId: blueocean-web
source:
version: 1.24.7
- groupId: io.jenkins.plugins
artifactId: snakeyaml-api
source:
version: 1.27.0
|
再次编译构建之后,Jenkins 就可以正常运行了。
5. 总结
作为一个存在十多年的编排引擎,Jenkins 具有很大的先发优势,在插件生态、周边工具建设方面十分完善。
本文主要是介绍了几个不常用,但有用的功能:
- Jenkins CLI 工具。通过命令行工具,管理 Jenkins 是一个有意思的地方,可以很方便地进行自动化集成。
- custom-war-packager 定制镜像。将插件、配置等 Jenkins 依赖的内容打包成一个整体,用于部署,能够很好管理运行环境。
但这两种方式在插件兼容方面都没有很好适配,需要人为干预。


